Solutions
Save images for Web in Photoshop
One of the more critical features that Photoshop offers is the Save for Web / devices offer.
Why use it? While you could just save your file in a standard method such as File / Save As, Save for Web / devices function does three things are crucial.
Saving Your File for the Web
It optimizes the file dimensions (for example: 150 px X 150 px) allowing it to fit into web pages cleaner and look better and less distorted.
- It optimizes the file size (for example: 23 kb) allowing it to download faster.
- It saves in the RGB (or monitor) format as opposed to the CMYK (print) format.
- This tool works great for outputting Twitter icons, Facebook profile pics, product files, blog images and source files for favicons.
Step 1 : Open Your Source File
To get started, you’ll need to go to File/Open to open your file. It can be in any format – jpg, gif, psd, png or others. As long as Photoshop can open it, you can output it for the web.
Step 2 : Saving Your File for the Web
We are going to skip ahead to saving for the Web, assuming that you’ve made whatever adjustments you require. Obviously, if you need to edit the image, do that first and continue with this step later.
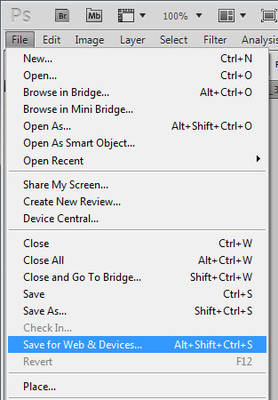
Go to File / Save for Web/Devices and click. It is about half way down the drop down menu.
This process doesn’t change your original file at all. You are creating a new file. Once you complete this tutorial and return to your original image in Photoshop you’ll need to save that file if you’ve made any changes to it. It’s important to name your new image different than your original one. Often simply adding _web to the file name will work well. (example: filename_web.jpg)
Step 3 : Chose the File Type for Export
In this option, the type of original file doesn’t matter. You can choose whatever file you need.
Note: to begin the process you’ll need to click on the image on the right. The image needs to be selected to be processed.
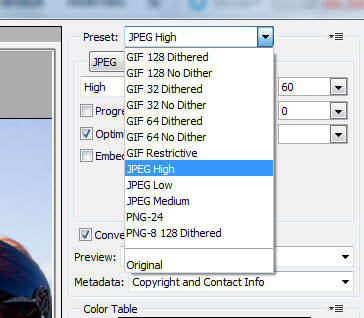
The most common is jpg for the web – it is the smallest file format which means it downloads faster for your site visitors. If you have transparency chose png-24. If you don’t know what transparency means you should chose jpg.
Step 4 : Choose Image Quality
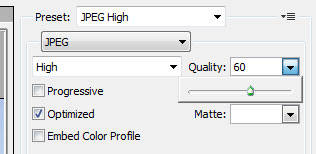
Each of the three jpg options (High, Medium, Low) have preset quality settings – which can all be manually adjusted. If you are viewing at 100% you can decide what quality you need. To adjust the level of zoom, see Step 5. The image will look the same online as it does in the preview window.
If you chose anything other than jpg you can skip this step.
Step 5 : Save Your File
Once you have made the necessary adjustments you are ready to save the file. Click “Save” and chose the folder and file name you want for this new image.
Congratulations! Your new file is ready to be used online.


